


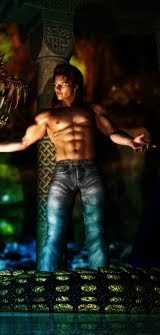


he's uploaded at pinup size ... enjoy!
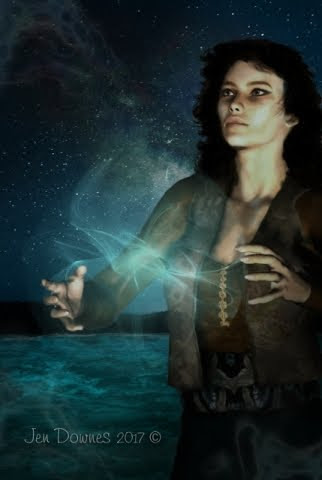
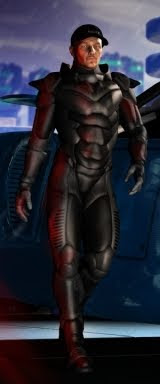
Just one image today -- because I was painting on this for over an hour. The shadows just refused to go properly in the render, so in the end I said words along the lines of, "stuff it, I'm wasting my time ... I''ll just paint the shadows later. So, around 80% of the shadows and highlights you see in this image are hand-painted, including all the highlights on the (ahem!) costume, and most of those of the skin and floor too. So--
How to paint realistic shadows in Photoshop?
It's not actually that hard, it's just that the penny has to drop, and it can take a long time dropping! If you're looking for a quickie tutorial, here's the "one minute toot" version:

By far the most important tools are your own eyes. It's essential that you know what your lights are, and where they are. If you know for a fact you have -- say -- two spotlights on this side of the model and they're this far away, and this bright, then you've got a pretty good idea where the shadows ought to fall, and how, and why.
The first golden thread of truth: in the real world, different kinds of lights cast different kinds of shadows on different kinds of surfaces. You can refer to photos to see how this works. Look at a dozen pictures, connect what you reckon you're seeing back to what you know the light source was (the sun? A lamp? Car headlights? Candles? An open fire?) and you can pretty quickly figure out what basic kind of shadow you need to be painting to get a realistic effect. Hard shadow? Soft shadow? Deep shadow? Lighter shadow? It's actually easy to paint any of these in Photoshop.
So you can get a handle on what you want to be painting. Next ... paint it -- in as many layers as there are shadows, or surfaces collecting the shadows. There's at least five layers used to create the shadows you see on this little bit of today's painting (and I'm calling it a painting, not a render, because it's very, very heavily overpainted.)
Here's the easiest way to paint in the shadows. Once you know how the shadow ought to be falling (and you work that out by knowing where the light is, how far away it is, and how bright it is, and checking what you know about your lights against real-world photos), then open up a new layer. Sample the color of the surface that's collecting the shadow ... take that color down to almost as dark as it will go. Adjust your brush for size, hardness and opacity appropriate to the area you're painting, and how dark you want the shadow to be. You're painting in a very, very deep shade of the surface's own color ... paint it DARK.Whop on a ton of virtual paint -- don't be worried about painting it almost black, because the next thing you're going to do is change the merge (blend) mode of this layer to "multiply," and then drop the opacity to wherever it needs to be, to look good. Last thing: is this supposed to be a soft shadow, like the one cast by the hilt of the dagger? If yes, then on your Filters menu, choose Blur > Gaussian, and adjust the blur on this layer till you get exactly what you want. Have a fiddle with the opacity after blurring the layer. Hee hee! The shadow comes up looking juuust what you wanted!
Repeat process for each shadow you need to paint in. The more you do it, the quicker you get at it. In a little while you'll be whipping through this process in no time.
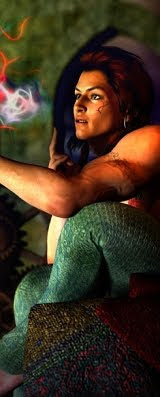
The other thing you can do is add life and zest to other areas of your image by adding highlights:

Here, virtually every shadow and highlight has been hand-painted. The material of the costume rendered okay, but it looked just plain dull. Boring. Not what I'd wanted at all. So again I thought, "what the hey, call it done, and I'll paint it later.
So, what's the process for painting highlights? It's just about the reverse of painting shadows, as you'd expect. Paint on a different layer for each surface that's receiving the highlights (one for the face; one for the chest; one for the earrings; one for the armor, and so on). Sample the color of the surface that is to be painted ... take that color out to almost white. Adjust your brush for size, hardness and opacity. Whop a lot of virtual paint on, where you figure the object ought to shine. Don't be afraid to paint great splodges of near white, because the next thing you're going to do is change the merge (blend) mode of these layers to Overlay (aha!) and then have a fiddle with the opacity to boot. And -- hee hee! Check out the result by turning the highlight layer on and off and on again. You won't believe how dull and boring the layer was before it was painted. You can also apply by blur to highlight layers, if you need to.
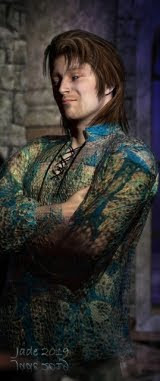
Before you start hand-painting hair, you can get a bit more mileage out of the DAZ Studio (and I guess, Poser) hairstyles by using a couple of tricks:
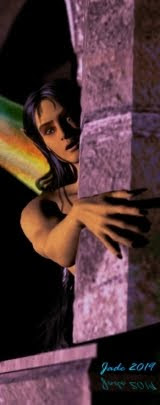
 |
| !!!!before the shadows and highlights were Photoshopped |
This is the Midnight Prince hair, which is still one of the best styles available. This, here, has the sumptuous look of having been hand-painted, but it's not. What I've done to get a bit more mileage is to go into the surfaces tab, pick up the individual layers of the hair (there's about six or eight in this one; some styles have just a few, some have as many as a dozen), and change the specular color and strength on each later. It's dead simple, very fast, and this trick can save you a lot of time in post work in Photoshop.
One interesting this is that the eyelashes you see here ... are hand painted. For some reason, nothing I did would make the eyelashes render properly, and I thought (you got it!) "paint it later." The way to do this is very similar to painting shadows, but how successful you'll be pivots on how BIG your image is. To get this kind of a result, you need to have a biiiiiiig image to paint on. You can render it huge, if your processor and time budget will allow for this, or you can actually double or quadruple the size of your image in Photoshop, then paint the eyelashes in, and then reduce it back to normal size. I rendered this at 1400 wide and 1600 high, because I knew ahead of time, it was going to be a bear to paint this. The render just didn't want to play nice. Photoshop to the rescue.
And there you go, that's basically it. The costume, what there is of it, is pieced together from four sets of clothing and jewelry. The ivy in the background is from the Reparation standing set. The hair is, as I said, Midnight Prince. The sword and dagger are from either Fae Weapons or High Fantasy, and I can't remember which, but you can find both at DAZ. I changed the textures, opacity maps and displacement maps on the costume -- doing my own mapping is part of the fun. The character -- face and body morph -- sorry, he's one of mine, you can't but this one anywhere. I've called him Leon for a looooong time.
I have some more images rendering on the other computer. With any luck, I'll be back tomorrow with some serious eye candy!
Jade, May 22