


click to see all art at large size: they're compressed, so shouldn't take long to download
I've been busy with art ... time to post the images is a whole 'nother question! So I'm posting them all today, because it could be another couple of days before I can get back on and post more.
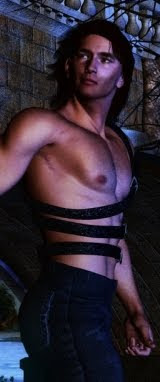
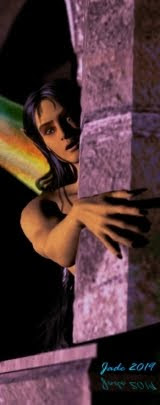
The first two images follow on from the spaceport scene you saw in full daylight a few days ago, and there's a story that goes along with this. It's the same character, same spaceplane ... but it's night now. It's hot. And the damn' thing won't start up for love or money. He's working on it, trying to get it fixed, when he hears someone approaching. A guy steps out of the night: "Looks like you need a hand there." But the hero knows there ain't no such thing as a free lunch. Yes, he needs a hand, but what does this tall, handsome stranger want in return...? Naturally, he's a tad bit suspicious, and...

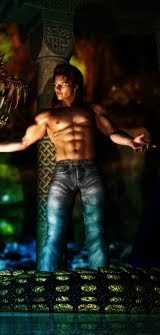
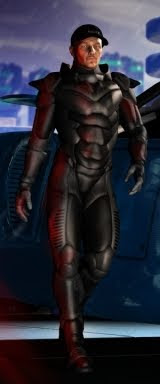
Sure enough, two days later our intrepid hero is flying a dangerous mission over an inhospitable world where the atmosphere would strip your lungs!
The top two pieces were done in DAZ Studio ... and I'm starting to long for a proper render engine. I'd committed to this skinmap (SAV Eros), and discovered way too late that it won't render properly in DAZ. As soon as you turn on raytracing, the whole skin turns into a mosaic, with "join lines" showing everywhere. It was biiiig fun painting them out in Photoshop. I chose to do the work because it was great practice for me -- I'm still trying to wire up my brain to handle a mouse pen well enough to make it worthwhile putting down some serious money to get a proper one. This was a fine exercise.
The horse picture is lovely ... it uses this Bryce landscape render as the background:

This was a separate project, and done in daylight. Turning it into moonlight involved putting a "color cast layer" on it inn Photoshop (using a bucket-filled layer) and jiggling the settings till they were just right. The results are very nice indeed. Check out the grasses and plants in this Bryce picture ...! For the first time ever, I have the chance to use what the call the Instancing Lab. Basically, you create a plant, or grass, whatever, and then you "paint" the object onto the terrain in swatches and bunches. You could grass up a whole hillside with a stroke of the virtual brush. The downside? The render times blow out. This picture was rendered at 1500 pixels wide, and even with the PC I have now (thanks to my husband, may blessings be upon him) it was a 2 hr 36 min render. But worth every minute! A little bit of color and light correction was done in Photoshop later; and when it turned into a nighttime shot to be used with the horse, the moon was painted on using an .abr brush, last of all.
Those are stock trees: the big ones in the middle are the Special Acacia, and while it's true that most Bryce trees don't look so convincing, some do. Speaking of trees...

These coconut palms were created in Bryce by Dave, and exported over to me -- handed to me on a jump drive, and I built this landscape around them. These trees are really cool ... great work from Dave. Check out the clouds drifting in front of the volcanic mountain there ... you might assume they were painted on later in Photoshop. Nope! They were created as objects and plunked right there in midair! You make a primitive shape and apply "materials" to it. Fuzzy, transparent, pale, soft ... result, clouds. In fact, the little pool in the grove in the previous picture was also done as a flat primitive, with a water effect slapped on it. Neat!
The last thing that I want to mention about today's images is the mane on the horse. It's glorious ... it's hand-painted ... but not by me! I'm still at the crayon stage, trying to figure out how to make my hand behave itself and use a mouse pen as easily as it uses a pencil or paintbrush. These manes and tails were painted by a designer called CWRW, and you buy them (via Renderosity) as PSD files filled with layers. You lift out the layer(s) you want, and then use the tools in Photoshop to reshape, skew, resize, flip, color and so forth, to make the pre-painted elements fit your scene. As soon as you're used to Photoshop, it's quite easy, whereas actually painting the manes and tails is a job for someone whose hand will behave itself with a mouse pen just the way mine won't. Kudos to CWRW: marvelous work. In the picture above, the mane was built up from various hanks of hair; I did about 10 layers of them, and I love the result.
Don't give up on me: it might be a couple of days before I can get back with another post, but you just knooow that the artwork is rendering away to itself in the background!
Jade, January 21