But the question is, how do you make this find of water in DAZ Studio 3, without recourse to Bryce or Vue etc.? Is it a model you can buy? Well, there probably is a model, but you don't need one, so save your pennies for something you do need - cuz I'm going to tell all. Bear with me, and in twenty minutes you'll be doing this too!
All images in this post have been uploaded at 100% size, 1:1 with the size at which they were created. All instructions are on the images,but I'm going to repeat them in the text here, so that Google can find them. Google's dear little bots can't read text which is buried inside images.
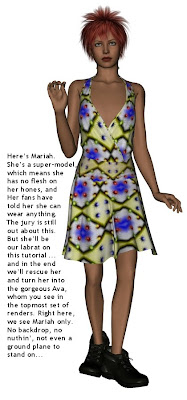
So: Here, above, is Mariah. She’s a super-model,which means she has no flesh on her bones, and her fans have told her she can wear anything. The jury is still out about this. But she’ll be our labrat on this tutorial ... and in the end we’ll rescue her and turn her into the gorgeous Ava, whom you see in the topmost set of renders. Right here, we see Mariah only. No backdrop, no nuthin’, not even a ground plane to stand on...
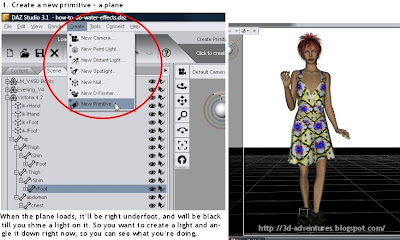
So the first thing to create is the surface of the water. Create a primitive ... open your CREATE dropdown. Choose PRIMITIVE, and then click PLANE. That's it. When the plane loads, it'll appear underfoot and it'll be black till you shine a light on it. So you probably want to create a light overhead and point it down, so you can see what you're doing. This plane is going to become the surface of your water. Right so far.
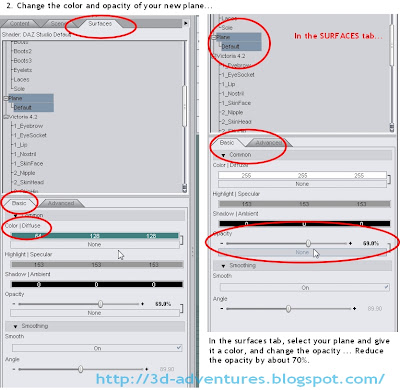
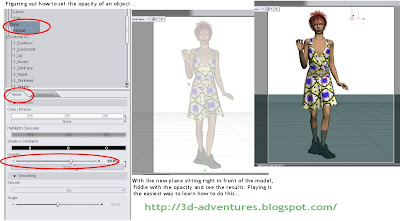
The next thing you want to do is to change the surface parameters of your water plane, and you do this in the SURFACES tab. Select the plane, and then, in the BASIC tab, drop the opacity to about 70%, and also set a nice bluey-green color. Then, you want to be able to see the effect of this, so -- grab the plane and swing it through 90%, park it dead in front of Mariah, so you can see what you've done so far. Cool:
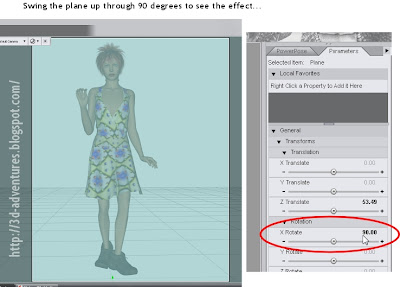
Figuring out how to work with opacities and colors is a question of playing with the surface till the penny drops. Go ahead and play! When you're done, swing the water plan back flat, about ankle high, and leave it at around 70% opacity, and that nice green color you started with. Right:
The next thing to do is to change the surface characteristics, because water ripples and reflects. You do this by applying a displacement map to the plane, and by cranking the reflectivity up to 100%. You do this in the surfaces tab again, like this:
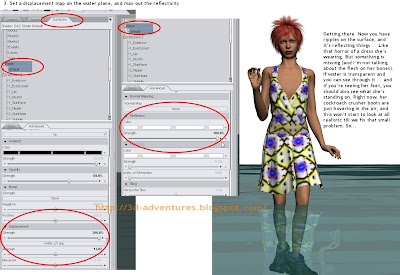
(If you don't know what a displacement map is, click here, and read some other tutorials of mine on the blog right here. I actually hand-painted the displacement map for this water in about three minutes flat. Trust me -- there is nothing to it, and the last thing you want to do is pay money for this kind of thing!)
We're getting there. Now you have ripples on the surface, and it’s reflecting things ... like that horror of a dress she’s wearing. But something is missing (and I’m not talking about the flesh on her bones). If water is transparent and you can see through it ... and if you’re seeing her feet, you should also see what she’s standing on. Right now, her cockroach crusher boots are just hovering in the air, and this won’t start to look at all realistic till we fix that small problem. So...
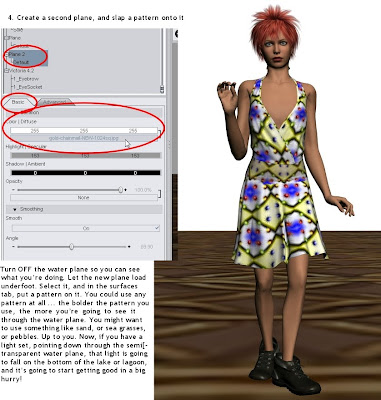
Turn OFF the water plane so you can see what you’re doing. Create a second plane. Let the new plane load underfoot. Select it, and in the surfaces tab, put a texture on it by applying a jpg image to it. You could use any pattern at all ... the bolder the pattern you use, the more you’re going to see it through the water plane. You might want to use something like sand, or sea grasses, or pebbles. Up to you. Now, if you have a light set, pointing down through the semi-transparent water plane, that light is going to fall on the bottom of the lake or lagoon, and it’s going to start getting good in a big hurry!
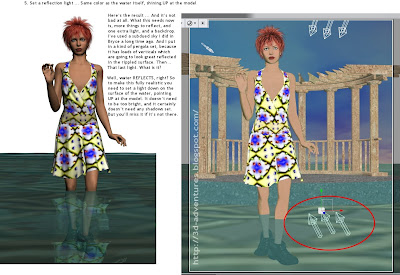
Here’s the result ... and it’s not bad at all. What this needs now is, more things to reflect, and one extra light, and a backdrop. I’ve used a subdued sky I did in Bryce a long time ago. You could also use a photo of the real sky. And I put in a kind of pergola set, because it has loads of verticals which are going to look great reflected in the rippled surface. Then ... that last light. What is it?
Well, water REFLECTS, right? So to make this fully realistic you need to set a light down on the surface of the water, pointing UP at the model. It doesn’t need to be too bright, and it certainly doesn’t need any shadows set. But you’ll miss it if it’s not there...
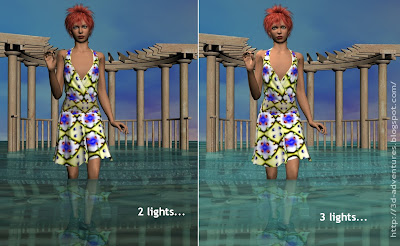
And that really is just about it. Now, you can fiddle with the Victoria 4, because Mariah is messing up what could be a very nice shoot:


