


So here's the inside story: if you're doing 3D artwork, and if you're getting jacked around right royally by your software, it's time to drop few hundred bucks and upgrade. Get a video card that's at least one gig. Then see if you have the capacity to whack some extra ram in there. Fortunately, memory is relatively cheap these days. Make sure the guy at the store cross references the power requirements of the video card with your power supply. This is critical, because the damn' power supplies can actually blow up!!
The results are amazing ...it's like you got a whole new computer...
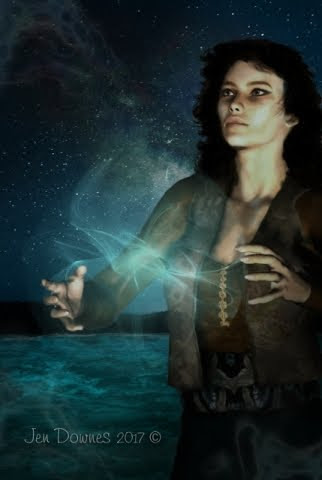
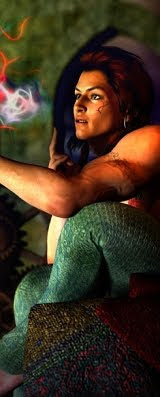
If you've been following this blog for any length of time, you'll recognize the Barbarian Queen from the Stormlight series of renders:
http://3d-adventures.blogspot.com/2010/04/3d-fantasy-petitioning-gods-of-storm.html
http://3d-adventures.blogspot.com/2010/04/3d-art-barbarian-queen-stormlight.html
Previously, to get the two characters into the scene I had to strip out the background set and props and put in a simple JPEG backdrop, and even then it would be jerk-jerk-jerk, and also crash-crash-crash for two or three hours to get two renders. Now? I can do literally anything with the two characters inside a real, genuine 3D set. This one is called The Shrine, and I got it via Renderosity. I'm very impressed with this ... it's from a design studio called DM, and I have several of their models -- they're all absolutely top notch. (Another designer I like hugely is Merlin ... and with the crash-hot video card and all, I'll be able to render the Medieval Tavern!)
And now a complete change of pace --
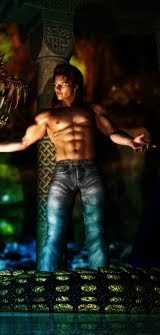
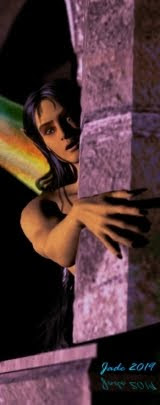
Gimp brush effects worked over and under a DAZ 3D model. I just did this for the new Sara Lansing story:
 It's so new, it doesn't even have its text objects in yet, but you can see it's a book cover. And it's an even mix of Gimp brush effects and DAZ 3D...
The other day I told where to get the Gimp brushes (see this post, and others...), and I told how to "install" them. You don't actually install them, just unpack them and copy them into the Gimp brush folder (see this post...), and I promised to come back and talk about how to get these effects. I never did get the chance then -- but here I am, now!
First, to answer the astute question: where the heck is the damn' Gimp brush folder?! I didn't actually give this in the previous post, because it all depends on where YOU install the program! But here I'll assume you opted for the defaults, in which case you'll find the brush folder here:
C:\ProgramFiles\GIMP-2.0\share\gimp\2.0\brushes
Mind you, if you installed the program somewhere else, that could easily start out with something like E:\AlfredsFiles\ ...!
But once you get inside the Gimp folder hierarchy, it's the same from there on in
So, unpack all your brushes -- .gbr and .abr -- and just copy them into the \brushes folder. Start up Gimp, or else refresh the brushes menu, and there they are. Now ... what to do with them?
If you're used to airbrush painting in something like Micrographx or XRes, or similar, you have half an idea. Here, though, instead of painting with a round, square, hard, fuzzy, transparent or sold blob, you're painting with a JPEG image!! The image can be a cloud ... a puff of smoke or steam ... a veil of fog ... a tree ... a bird or butterfly or dragon. Or cracks, or grunge, or just about anything else you can imagine.
So it stands to reason that if you hold down the mouse button and draaaaag the mouse across the screen, you'll lose the crisp, sharp image you started with...

The effect you want is almost certainly the one on the left. Why? Because if you're going to use your Gimp and Photoshop brushes to paint trees into a landscape, or clouds or the moon into the sky, and then paint fog on top of the whole shebang, you want the objects you just painted in to be recognizable. Sure, you can get some surreal effects by dragging the brush, but if you want to paint a backdrop -- maybe something like the Sara Lansing cover, above -- don't drag the mouse!!
The book cover there was done in three layers:
The background was painted from scratch -- but the model was posed first, and the backdrop was designed to be the right size and shape to suit the model. The model was posed in DAZ Studio 3, then the backdrop was painted in Gimp. The rain was painted into the background at this stage. Then this Gimp painting was imported into DAZ as a backdrop and the whole image was rendered...
The finished render was then brought back into Gimp as a new image. Now, working in a second layer so that I didn't mess up the existing artwork, just the right amount of rain was brushed on over the figure, and then some mist was brushed on in the foreground. Then both layers were flattened into the final image.
So you had three layers: background ... DAZ model rendered against this ... rain and mist laid over the top.
This post assumes you know how to change brush sizes, opacities, colors ... brush dynamics. If you need to learn these things, there are some good tutorials online. Here, I'm talking specifically about getting Gimp to shake hands with DAZ and produce hybrid images. Some of the nicest work I've done recently has started in Bryce, moved into DAZ and been finished in Gimp. You can get some terrific effects.
Jade, 9 May