


 In 3D art, post production work is often totally overlooked. I can understand this ... technically, you ought to be able to (and you can) finish every detail of the work in your 3D Studio, such as DAZ, Poser, 3D Studio Max and such like...
But it would take a week to get the whole thing ship-shape this way! The only reason you'd do it would be for a pay check. Let's say you were doing outsource work for Weta Digital or Rising Sun. Now, I can see the point of slogging away adjusting every last thing and building the whole scene in 3D ... and lighting it!
For the average artist, though, there are so many shortcuts, you can produce a quite complex render in about an hour, and use post production trickery to pull it into shape, then, tomorrow, you can start on another scene. I promised I'd have a look at post-pro work in today's post, so ... here we go!
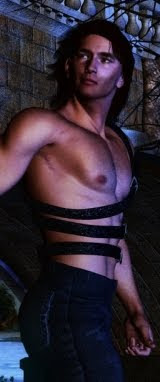
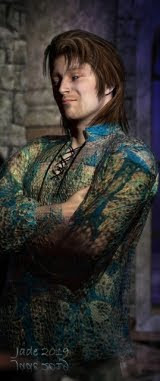
In the scene above, the idea is that a guy is practising Tai Chi in the early morning. He's on his own, he's lost in his own world, enjoying the sun. So the first thing you need to do is set up the character and action to realize your idea ... the idea and gathering the 3D models, you could call this pre-production work. This image uses...
- Michael 4
- Remendado skin map, tattoos turned OFF
- Mon Chevalier hair, texture set to "honey"
- Loin cloth from the Wood God costume set (you could also use the speedoes from the M4 Basic Wear costume set)
- Tai Chi pose, either from a pose set, or do it yourself, or a bit of both...
And that's it. No more models to import! You might think this makes it a really simple picture to create ... you'd be wrong.
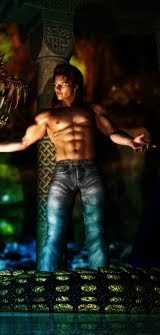
If you render it just as is, you get this:

...and that'd be terrific for illustrating a book on Tai Chi, but if you had a vision of a guy practising Tai Chi alone in the early morning at a secluded pool, this ain't it. Not yet.
Now, technically, you're done with your 3D work here -- unless you count lighting as part of the job. Some people do, some don't ... this one, you'll have to decide for yourself! If you belong to the group that says 3D is about the models and the lights are separate -- everything from this point onward is post work! (I think the lighting is part of the 3D work ... they're 3D lights after all, and it all takes place inside the 3D studio.)
To make a scene out of the figure, the first thing you're going to want is a background. You could do this by adding a cyclorama and putting images onto it ... but the challenge is to find the exact image you want, and have it the the exact right dimensions (not size!) to do the job, and also have the shadows running in the right direction...
If you're short of time -- most of us are, I know I am! -- you might take the quick route. I often have to, or this work wouldn't get done at all.
You take a photo that looks a lot like the scene you had in mind, and use it as a backdrop! This is a shot of the Morialta Falls in the summer time. You can tell it's summer: the falls are dry. In winter, so long as there's been rain, there'll be a cascade.
Some work was already done on the background pic to get it to this stage:
 The actual falls is narrower than this ... I broadened the rock formations out by about double what they really are. Then, there's actually a person sitting on a rock in the background! The picture was loaded up in my paint program (I use Micrographx) and the person was painted right out. Also the image was softened, blurred, to the right degree, otherwise the background would be so sharply in focus, the character looks like he was cut out and stuck on it! Think about the way a photo has one area in focus and the rest soft. This is called "depth of field." If the Michael 4 model is going to be in focus, the background has to be a bit softer. The only trick is knowing how soft is soft enough. You can only figure this out by doing it. Then the image was saved and imported into DAZ Studio 3 as a backdrop.
So far so good, but it looks fake. What's missing? Shadows -- and lights! This, above, is the character standing in his own default light in DAZ Studio, with a photo pasted in behind him. Now, you get to work on the lights. You're trying to simulate morning sunlight.
I used three distant lights. There's a gold one, very bright, off his left shoulder; there's a light green one, quite soft, simulating the light that's being reflected off the ground at him; and a blue light off to the right, simulating ambient light from the shadow areas. You play around with them till you get them good enough, and you have a render you're happy with -
Except for one thing. The guy is still floating in the middle of a background. He's not casting any shadows ... nothing under his feet anchoring him to the ground.
Well, in fact he is floating! Remember the rule: lights can't cast shadows on a backdrop image, only on other models ... and we took the shortcut and loaded an image as a backdrop, not a whole suite of other models. No matter how clever you get with the lights, he's never going to cast a shadow on the backdrop.
So, right here you make the decision: dump the backdrop picture and start loading up a cyclorama, then hunting for the right environment to put on it? Or do you want the image finished in the next half hour? Most of us have to rush back to work, so it's almost always the second of those choices!
Import your absolute-best render into your paint program, and literally paint in the shadows. Use the darken/lighten tool. Set the shadow direction -- look hard at the image and see where the light source is coming from. Then paint in the shadows, where your eye tells you they ought to be. Also, darken the shadows around his face and chest right now -- remember, strong sunlight creates darker shadows... Now, that's now bad -- but something still isn't right. It's the heavy shadowed area on the right of the picture, it's pulling the image off-balance.
Right now you have two choices. You can crop it out and resize the image, like the solution below. This is a good way to go, but what stopped me using this is that you lose the "sense of place." I the cropped version, you can't tell any more where the scene is set. It's just boulders in the background:
 To finish the image, I took the other option. Before putting the border and signature on it and calling it done, I did a bit more post work. I copied it back into my paint program and used the Darken tool, set to All Tones, to darken the other side of the background, as if it's in shade too. It created a "painting" effect ... balances it out. You could also go for cropping, if the "sense of place" is not important to you ... your call!
One thing was fixed on the model, too, before work started on the background. If you look at the first-off render (just the figure, no background), you can see the hair isn't a good fit in this pose. It seems to disappear into his right shoulder. I could have adjusted it using the Mon Chevalier morphs, but I didn't have the time. So I repainted it in post work. Okay, I cheated. It's nice to know how to cheat now and then ... saves a lot of time!
Jade, 10 February