


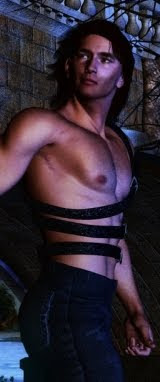
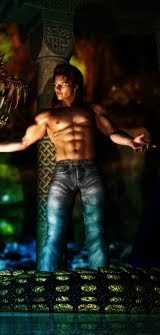


 3D art ... fantasy horses ... beauiful young men ... unearthly beauty in both species ... what else can you say? You practically don't need me to ramble on -- but I will anyway, because these are very very complex shots, and I promised a long time ago to share how it's all done!
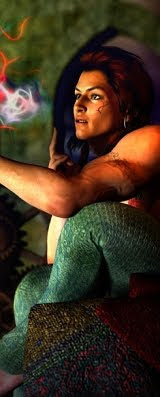
The shots above involve these materials:
Michael 4 (face designed by me)- Danyel's hair set to long in the back
- Jagger skin map, no tattoos or hairy chest
- Speedoes from the M4 Basic Wear pack, set to skin tone
- Millennium Horse
- CWRW Pro texture set to Dappled Gray
- MAT-Mor mane add-0n: man set to long and curly
Grass prop from the Horizon redux prop set - Stone pedastel from the EROC column construction kit
- Backdrop digital painting (by me)
- 2x shrubs from the DAZ Cyclorama "wilds" kit
- 1x tree prop from the DAZ Cylorama forest kit
- 4 distant lights set to blue and mauve
- 6 point lights set to blues, greens and white
- Deep shadow maps set for all distant lights

...and that's where the fun begins, because that lot loaded into the scene is enough to slow the computer way down. But it's well worth the work of posing the horse and boy this way and that because the results are gorgeous.
One thing I have discovered: when you're working with a heck of a lot of models in the same scene, it's actually easir (much) to fly the camera around the stationery models than to try to move all the models around. Think about it! The model stays still, the camera moves ... the model appears to move as the camera flies around.
To do this, select Default Camera in your Views drop down (the one in the very corner of the Viewport), and also select Default Camera fromyour scene contents list ... usually sitting at the bottom of a gigantically long list is things you've imported. Now, you're seeing threough the camera. So if you move the camera UP, eveything in the shot goes DOWN. If you move the camera to the right ... you got it. Everything in the shot goes to the left. Same for rotations. For Zoom, you use the Z coordinate slider ... zoom in, zoom out.
And here and there the whole scene just comes together and something beautiful appears. This is when you'd click the shutter, if you were using an actual camera. This is a virtual camerta, so when you see something beautiful hit RENDER!

I confess that there's a fair bit of post production work done on these images too, and I ought to talk about "post" techniques. You can take reasonable shots and make them good in "post," and you can take good shots and make them phenomenal.
So join me tomorrow, and we'll talk about Post Production effects...!
Jade, 9 February