


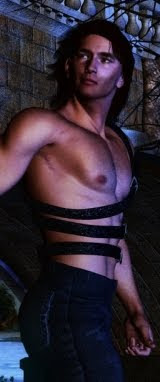
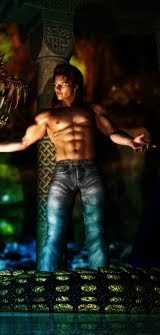


 As promised, I'm back, finishing the discussion on character creation in DAZ Studio 3. I'm still working with the Gil Cronin model you saw yesterday, because so much more went into this one than "just" the face. if you know the character from the books, Gil is a big boy. A very big boy. You have to be, to even get into the descant units aboard a NARC carrier ... and if all this is making no sense to you, check out yesterday's post!
So -- the first thing I did even before I got to work on Michael 4's face, was to blow-out the body morphology. Compare this character with Jarrat and Stone, or almost anything else that's appeared on the blog so far, and you can see the terrific latitude you have in DAZ 3D. You really can do anything at all...
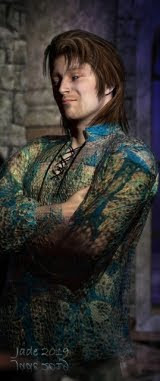
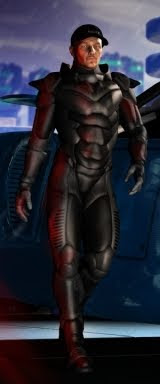
 Would you believe the iridescent muscle shirt is actually the same shirt you see Jarrat wearing in this post here ... just with the colors and surface textures changed?! You do this in the surfaces tab ... more about that later!
So, okay, the guy's a knockout, but HOW do you do this? Is there a cookbook method? Turns out ... there is. It's actually like painting by numbers in 3D. And here's how you do it:
Import Michael 4, and have at least some idea in mind of what you'd like the end result to look like. Without a vague idea of where you're going, you can wind up with a cross between the Incredible Hulk and Legolas ... whacked out of shape and looking a bit, um, "off." Okay, with Michael 4 loaded up and ready to go, select the model and then load the Morphs++ pack. You buy this separately (the base model itself is actually free). So if you don't have it, time to get it!
Then, with the model selected, choose WHOLE BODY from the selection offered to you in the Morphs++ menu, and ... a whole package of goodies opens up. You can a swag of icons in your left-side pane, and as you click on them they're added to the right side Parameters pane; they show up as slider bars. You drag those sliders and the model morphs before your eyes!
To get this effect here, I used Body-builder and Definition. Basically, you just look for a balance that looks natural enough to be a guy who lives in the gym on a high protein diet, but still looks "real." You'll find out what I mean when you drag the slider bars too far! Back 'em off till the design comes out well, and call it good. SAVE the file! Because you're going to want to come back to this model many times.
 Now, this character also has the high-rez skin map added, to get the dusky complexion. In the books, the average Earth-born human is described as looking "Afro-Eurasian," which is going to mean olive skinned, for sure, but not too dark; probably with a little bit of the lovely almond eyes one associated with "Asian" and something of the luscious lips one associates with genes issuing from points south of Spain, yet something of the European left ... well, since the skin type, lips and eyes have all been adjusted, that just leaves the nose to suggest the Euro heritage. So working the face was not quite as much of a shot in the dark as you might think!
 Put the whole lot together, and the result is quite striking. Also see yesterday's renders for closer shots on the face, and also with the face set to various expressions... I have to say I'm really pleased with the way Gil Cronin turned out, and the author, Mel Keegan, is delighted.
 So there you are -- character creation from the ground up. A whole lot of fun!
Jade, 9 January